Wednesday, 25 April 2012

Pizza with a bread dough base


Hello


Welcome to something else yummy


Not many people can say they don't like pizza, even if it is just the plain cheese variety.  Our favourite though is homemade.  We make a bread dough and go on from there.  It is really easy and even though it might take a little bit of time, that is still better than going to the shops to buy one.


Ingredients for the base (Bread dough bottom)

580g strong bread flour
10g Yeast (approximately 1 teaspoon) The best dried one is Doves, in a little orange packet, we get ours from Waitrose as can't find it in the other supermarkets
20g salt (approximately 2 teaspoons)
2 tablespoons of cooking oil
300ml water (hot and cold. see below)


Method ( How to make it )

1)  Boil the kettle, measure out 100ml boiling water, then top it up with 200ml of cold water.  What you end up with is slightly warm water, which is what makes yeast very happy, too hot and you can kill it off and to cold and it takes ages to work. Yeast is a live thing. OK so you can't see little feet or leaves or any of that, but it is living, and when it is happy (warm and moist) it grows and grows and it is the yeast that makes bread rise up, so the happier the yeast, the bigger the dough gets. Hope that makes sense?

2)  Take your jug of warm water and add your yeast, stir it well until there are no lumps, then set it aside for a moment.

3)  Measure out your flour, pop it into a mixing bowl, add the salt and oil, and stir a little bit. If you have a food mixer, pop it into that bowl and attach the dough hook.

4)  Pour your yeasty water mix into your flour and time to get your hands dirty... hope you washed them?  Use your hands to mix it altogether, when you have formed it into a big dough ball it is time for kneading.  This is where it is useful to have a machine and dough hook as you can bung it all in, and on a slow setting mix for 4- 5 minutes.

5)  Kneading your dough is hard work, but you have to do it.  without getting to technical, it stretched the gluten in your dough making for a stronger mix and a better rise.  Flour your work surface lightly.  Put your dough ball into the middle, you need to press, down with one hand and stretch the mixture away from you. Pick up the end re form it, and do it again, this will go on for about 10 minutes, or until your arm aches so much you can't do it! If you can ask someone to help you with this bit that would be great.


6)  You know your dough is ready when you put your finger lightly into it and the finger mark starts to come back out.

7)  You are now ready for your first prove (Rising) Make a round shape with the dough, pop it into a large bowl, cover with cling film and then put it somewhere warm.


A window sill, an airing cupboard, or in our case on top of our tortoise tank, she doesn't seem to mind.

8)  Now leave it for a couple of hours, the dough should double in size, clever stuff!

9)  When it has doubled in size it is ready to use.  (If you were going to make bread, you would shape it, pop it into a baking tin and then leave to rise again for an hour or so, before cooking it in an oven with a tray of hot water on the shelf underneath it)

Mum and Joel's hand prints


To Make You Pizzas


10)  You need to divide your dough into the amount of pizzas you are hoping to make, ours makes size pizzas easily.


11)  Roll them out one at a time, if it is taking you a while wrap the other balls in cling film to top them drying out.


12) You can use a rolling pin, stretch with your hands, but don't try being to clever and spinning them above your heads like Italian Pizza chefs do, it may well end up in a game of Frisbee and a cross parent!


There is a quick video on youtube of this... http://www.youtube.com/watch?v=ChqrfO-f3Bs&feature=youtu.be
13) The toppings  - Your choice really, but we always start with the same tomato base;


2 Tablespoons tomato puree
1 Table spoon cooking oil
1 teaspoon of dried oregano
A Bit of garlic, either chopped fresh, or a teaspoon of dried

Mix it all together, and then spread over your bases


14)  Put on your favourite toppings, saving your cheese until last


15)  Bake for about 8 - 10 minutes

Mattie has to use a different pizza base because he has a wheat allergy


Enjoy


Which are your favourite toppings?

These are great to make with friends too, and can be a cheap meal using up bits and pieces

Toppings suggestions

Peppers, sweetcorn, mushrooms, sliced tomatoes, baby spinach, tuna, salami, ham, pineapple, grated carrot, courgette, goats cheese, rocket, basil leaves, capers....... oh, and we tried banana, odd but not awful.


Thank you to Joel's friend Jessica for helping us to cook, and to eat it up, and also to her mum who is one of the chief taste testers

We Hope you are enjoying our blog and would like to hear what you think and any ideas you have.

Bye for now

Ethan, Reuben, Mattie, Jacob, Joel Bean and Jessica

Rocket rockets, 3rd week


Hello Everybody


What a lot of rain, mum says it is good for the garden, but it just means wet play times for us!


We thought we would let you know how our rocket rockets are getting on this week.  Did you make any?  If not, give it a try, you can look back a couple of posts to see how we made ours.  In a few days we are going to make something similar but with beans, jack and the beanstalks, if you want to have a race with us, or just join in, you will need to get some runner bean seeds, a small plastic pot or toilet roll inside and something to decorate it.


For now, back to the rocket rockets...

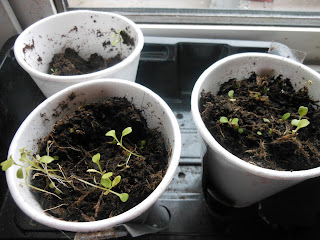
More like rocket snails, they have really slowed down!  Not looking much bigger really.

Here are the ones that tried to fly;


Here are they ones that landed safely;


At a glance they are not a lot different that's for sure, but if look really really closely, you can see that some of the stems have more than two leaves, there more coming, and these ones are more rocket leaf shaped too. 


When a seed sprouts and grows, it gets two leaves at first, which are called the seed leaves. These get the sunshine and convert it to plant food ( a great big, hard to spell, word called photosynthesis) and this plant food helps the plant to keep growing whilst the roots take up water.

Hopefully by next week there will be more to see.

Bye for now

Ethan, Reuben, Mattie, Jacob and Joel bean


Saturday, 21 April 2012

Yummy Breakfasts - Banana Toast


Good Morning


We have been making mashed banana on toast.


Mum says that the problem with making something yummy for breakfast in our house is that there are enough people to form a queue. She might be right, what started as one portion for one person soon became breakfast for everybody!


Ingredients ( What you need to make it with )


2  Slices of bread per person ( Mattie used gluten free )
1 small banana or half of a medium one

And that's it. You will also need a bowl, fork, and grill.  ( Mattie says it should be called a gorilla because we are monkeys eating bananas)


Method ( How you make it )

1)  Lightly (Not too brown) toast your bread


2)  Mash your banana in a bowl, it helps if you break it up into pieces first

It's harder than it looks!


3)  Spread the mashed banana on your toast


4)  Pop the banana toast under the grill to heat through and brown slightly

... you might cause an accident! Watch out Jacob!

Put your banana skins into the bin or.....


5)  Healthy and filling, yum yum. Mum says LET IT COOL A BIT OR YOU WILL BURN YOUR MOUTH!! It gets very hot


Jacob's new foot wear... banana slippers :)


What are your favourite breakfast treats?


Off to get up to monkey business, bye for now!


Jacob and Mattie

(Ethan, Reuben and Joel too)

Wednesday, 18 April 2012

Fruit Jellies


Hello again

Just a quick recipe this time, quick, easy and tasty and you can tell your parents that it is healthy because it has fruit in it..... OK, OK, so it also has lots of sugar because of the jelly, but keep them focused on the fruit bit :0)


I (Mattie) really like jelly, as I can't have wheat or dairy it is a good choice of pudding for me.


Ingredients ( What it is made from )

1 packet of cubed jelly, your favourite flavour, Mattie used lime
1 pint water ( more about this in a moment)
1 small tin of fruit, or come summer time a cup of fresh berries
DO NOT USE PINEAPPLE as your fruit, the acid in it make the jelly unable to set, even if you left it somewhere cold for a whole week!

You will also need a kettle, a pair of scissors, a jug and either 6 glasses or small pots or a large bowl (depending on whether you want individual jellies, or a bowl full for sharing)


Method ( How you make it )

1)  Carefully use your scissors to chop up your jelly into small pieces, the smaller they are the less stirring you will have to do on the next step. Put the chopped jelly into your jug


2)  Boil up some water, and very carefully pour some onto the jelly up to the half pint mark and stir until the jelly cubes are all dissolved


3)  If using tinned fruit - open the tin and carefully drain the juice only into the jug with the hot jelly mix, then top up to the 1 pint mark with cold water.
If using fresh fruit, just top up the hot jelly mix with cold water to the 1 pint mark


4) Divide your fruit between your glasses/pots/bowls or put into your large bowl, don't eat too much whilst you are doiing it :)


5)  Pour over your jelly mix


6)  Leave to cool for an hour, then place in the fridge until completely set (firm)


7)  Enjoy!

I hope you like my easy peasy fruity squeezy recipe :0) Maybe you could put it into plastic pots to put into your lunch boxes? Let me know which fruits youu have tried.

Bye Bye for now

Mattie

(Ethan, Reuben, Jacob and Joel Bean too )

Monday, 16 April 2012

Rocket rockets week 2, rockets can't fly!


Hello, is there anybody there?

The rocket rockets have had a good week, well, some of them have, and then some of them have not!

Here are Ethan, Reuben and Joel Bean's rockets....


The are growing really well and two weeks on look a bit like fat cress leaves.

Then there are Mattie, Jacob and Mum's rocket rockets...


What can we say about them that is polite, well, not a lot really, maybe that they are trying?

The thing is their rockets didn't have as much seed so were struggling anyway, then they decided to fly. No, really, we aren't joking! They flew through the air, propelled by our dog jumping up on the window sill, knocking the front of the tray with her paw and catapulting them weeeeeeeee through the air. Only it was more weeeeeee plonk really, plonk upside down on the carpet. Mum was really cross with the dog. It turns out that rocket rockets can't fly and so after trying to put the compost and weedy seedlings back into the rockets, we can only keep our finger crossed that something amazing happens and they get some extra energy from somewhere.


(P.s Mattie was heard muttering something about buying an already grown rocket plant and sneaking it in)


3 gardeners, and 2 new space craft owners signing off

Over and out

Ethan, Reuben, Mattie, Jacob and Joel Bean

Friday, 13 April 2012

Marshmellow Crispie Squares

Hello again

We made these really easily and it is a very tasty recipe. the bad news is that there is no way you could pretend to your parents that this recipe is healthy, but the good news is that we bet they love to eat it too.

It only uses four ingredients


Ingredients

100g Marshmallows
100g Toffees
100g Butter
100g rice crispies

Easy to remember the amounts! You also need, a saucepan, wooden spoon, mixing bowl and a baking tray with grease proof paper in the bottom of it or you won't get the mixture out again... well you might, but not neatly and easily... although if it fell apart you could claim to need to eat the 'crumbs' that would be yummy!

Method (how to put it together)

1)  Weigh out your ingredients, Reuben and Mattie told Jacob he needed exactly 373 rice crispies, and trusting them he started to count them out!!

 They did tell him eventually...


2)  Firstly unwrap your toffees, Mattie got that job, he's the only one who could be trusted not to eat them as he is dairy allergic!


Jacob got a shock when he saw the wrappers...

"Where have all of the toffees gone?" He thought they had been munched

3)  Put the toffees, marshmallows and butter into a saucepan, and heat slowly until melted. mum says - BE REALLY CAREFUL, THE MIXTURE GETS VERY VERY HOT AND CAN BURN YOU

Keep stirring so the mixture doesn't stick to the bottom of the pan

What shall we do with the leftover marshmallows?


5)  When the mixture has completely melted, add  it to your rice crispies and stir really well


6)  Next put your mixture into your baking tray, then leave to cool


Jacob believed they had eaten the mixture!


7)  When it is cool, cut it into squares and eat it :0)


We Hope you enjoy making this, Reuben and Mattie did, not sure about Jacob...

Bye for now

Ethan, reuben, Mattie, Jacob and Joel Bean

Thursday, 12 April 2012

What a busy week...


Hello again

We have had a busy week this week, so have been a bit slow getting to write about it all.

This week we have walked ENORMOUS hills, sat on Chesil beach, been in hail storms, seen thunder and lightening, walked in the countryside, been to a museum in Shaftsbury, baked, cycled, made dens at the allotment, picked nettles and wild garlic, went in a lighthouse and there is still one day left of the holidays!

Here is a snap shot of our adventures.

Mattie, mum and Reuben, you can't tell how high this is, but it really is a very long way up! Here is a link to show you. http://walks4softies.co.uk/Jwa04/Fontmell/Walk1/index.html
On Chesil Beach
Carrying  a tray of broad bean plants
A rhubarb umbrella as the rain started
Den building
Portland Bill light house
daisy, daisy...
Joel bean helping to plant broad beans